Battery switch on travel trailer function is crucial for managing your RV’s power. Understanding how to use your battery switch safely and effectively is key to enjoying worry-free camping. This guide will walk you through different battery switch types, proper operation, connection and disconnection procedures, troubleshooting tips, and maintenance best practices, ensuring you’re prepared for any situation on the road.
We’ll cover everything from the basics of single and dual battery setups to more advanced topics like integrating your battery switch with solar panels and inverters. Learn how to prevent common problems like corrosion and battery drain, and keep your travel trailer running smoothly.
Understanding Battery Switch Functionality in Travel Trailers
A battery switch is a crucial component in your travel trailer’s electrical system, allowing you to manage the power flow between your trailer’s batteries and various electrical appliances. Understanding its function is key to preventing electrical issues and ensuring a smooth camping experience. Proper use prevents accidental drain of your house batteries and allows you to charge them effectively.
Battery Switch Types
Travel trailers typically utilize several types of battery switches. The most common are single battery switches, dual battery switches, and more complex systems incorporating battery isolators or combiners. A single battery switch simply connects or disconnects a single battery to the trailer’s electrical system. Dual battery switches, as the name suggests, control two batteries independently, often a deep-cycle house battery and a starting battery for your tow vehicle.
More advanced systems provide more control and flexibility.
So, you’re planning a trip? Awesome! First things first: get yourself sorted with travel insurance. Check out Aon travel insurance for solid coverage. Then, if you’re an audiophile like me, don’t forget your tunes! Planning your audiophile travel setup beforehand is key for a truly enjoyable trip. Seriously, good headphones make even a budget flight feel luxurious.
Happy travels!
Operating a Battery Switch
Operating a battery switch is straightforward, but understanding the positions is important. Most switches have three positions: “Off,” “Battery 1,” and “Battery 2” (or similar designations depending on the number of batteries and switch type). The “Off” position completely disconnects both batteries from the trailer’s electrical system, preventing accidental discharge. “Battery 1” connects only the first battery to the system, while “Battery 2” connects only the second.
Some switches may also have a “Both” or “Combined” position that connects both batteries in parallel.Before operating the switch, always ensure that you understand your trailer’s wiring and battery configuration. Improper operation could damage your electrical system or lead to a dangerous situation.
Comparison of Battery Switch Types
| Feature | Single Battery Switch | Dual Battery Switch | Advanced Systems (Isolator/Combiner) |
|---|---|---|---|
| Number of Batteries Controlled | One | Two | Two or More |
| Functionality | Simple on/off control | Independent control of two batteries | Independent control, parallel connection for charging, automatic switching |
| Complexity | Low | Medium | High |
| Cost | Low | Medium | High |
Connecting and Disconnecting Batteries: Battery Switch On Travel Trailer Function
Connecting and disconnecting your travel trailer’s house battery involves straightforward steps, but safety is paramount. Improper handling can lead to injury or damage to your equipment. This section details the process, safety measures, and maintenance tips for optimal battery performance.Connecting and disconnecting your house battery to your trailer’s electrical system requires careful attention to detail and adherence to safety guidelines.
So, you’re planning a trip? Awesome! First things first: get travel insurance. Seriously, check out Aon travel insurance – they’ve got you covered. Then, if you’re an audiophile like me, think about your audiophile travel setup – you don’t want to compromise on sound quality while exploring the world! Make sure you’ve got both bases covered before you jet off; a good insurance plan and your favorite tunes are essential for a smooth trip.
Always remember that working with batteries involves potential hazards, so taking precautions is essential.
Battery Connection and Disconnection Procedure
To connect your house battery, first ensure the battery switch is in the “off” position. Then, firmly attach the positive (+) cable to the positive terminal of the battery and the negative (-) cable to the negative terminal. Tighten the connections securely using the appropriate wrench. Repeat this process for any additional batteries in your system. To disconnect, reverse the process, removing the negative cable first, then the positive cable.
Always ensure the battery switch is off before handling any cables.
Safety Precautions When Working with Batteries
Working with batteries requires careful attention to safety. Always wear safety glasses to protect your eyes from potential splashes of battery acid. Wear gloves to protect your hands from corrosion and acid. Never short-circuit the terminals by accidentally touching them together with a metal object. Ensure adequate ventilation as battery gases can be harmful.
If you spill battery acid, neutralize it immediately with baking soda and water, and clean the area thoroughly. If you’re unsure about any aspect of the process, consult a qualified technician.
Maintaining Battery Connections to Prevent Corrosion
Corrosion on battery terminals is a common problem that can reduce battery life and performance. To prevent corrosion, regularly inspect your battery terminals for signs of white, powdery buildup. Clean the terminals using a wire brush or terminal cleaner. Apply a battery terminal protector, such as dielectric grease, to prevent future corrosion. This grease creates a barrier that repels moisture and prevents oxidation.
Regular cleaning and application of this protective grease will significantly extend the lifespan of your battery connections.
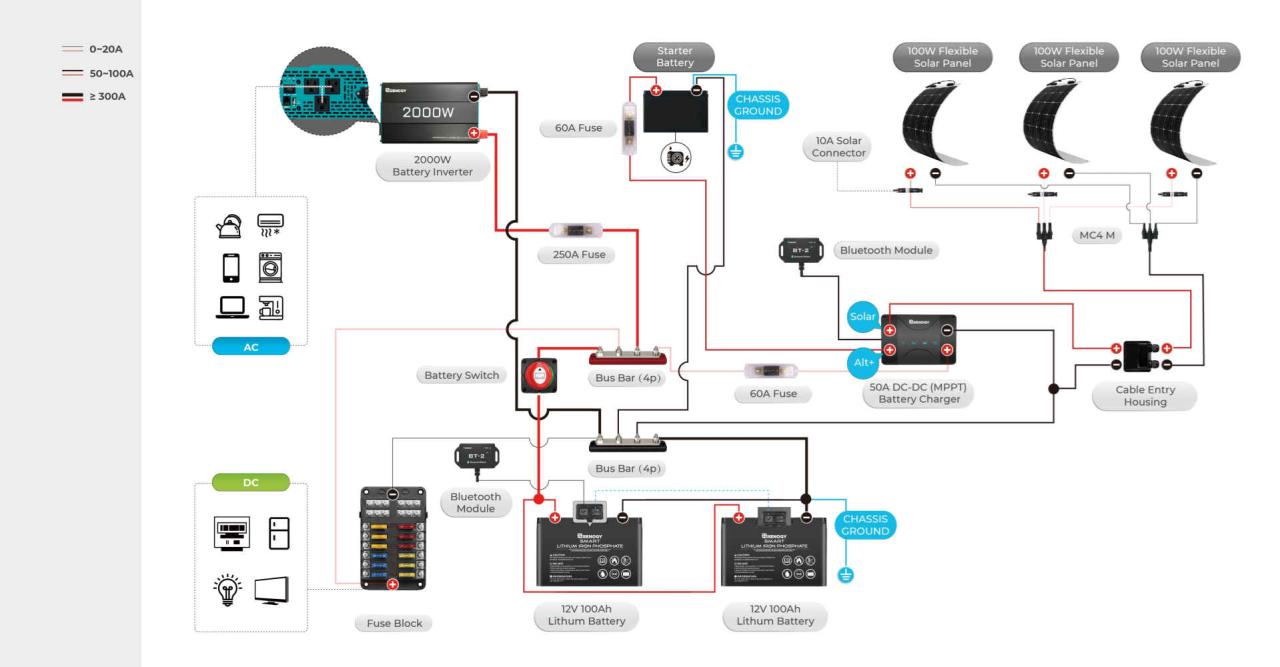
Visual Guide: Dual-Battery Wiring Connections
Imagine a diagram showing two 12-volt batteries, labeled Battery 1 and Battery 2. Each battery has a positive (+) and negative (-) terminal. A positive cable runs from the positive terminal of Battery 1 to a main positive bus bar. A second positive cable runs from the positive terminal of Battery 2 to the same bus bar. From the bus bar, a single, heavier-gauge positive cable runs to the positive terminal of your trailer’s electrical system.
Similarly, a negative cable runs from the negative terminal of Battery 1 to a main negative bus bar. Another negative cable connects from the negative terminal of Battery 2 to the same bus bar. A single, heavy-gauge negative cable runs from this bus bar to the negative terminal of your trailer’s electrical system. All connections should be secured with appropriate bolts and nuts, and dielectric grease should be applied to all connections to prevent corrosion.
The battery switch would be incorporated into the positive cable circuit between the bus bar and the trailer’s electrical system. This allows for switching both batteries on or off simultaneously. A clear diagram would also show the use of appropriately sized wire gauge for each connection.
Troubleshooting Common Battery Switch Issues
Your travel trailer’s battery switch is a crucial component, and problems with it can leave you stranded. Understanding common issues and how to troubleshoot them is essential for a smooth camping experience. This section will cover identifying problems, finding solutions, and preventing future issues.
Troubleshooting a faulty battery switch or a dead battery often involves a systematic approach. Starting with the simplest checks and moving to more complex diagnostics is the most efficient method.
Non-Functional Battery Switch
A non-functional battery switch can manifest in several ways: no power to the trailer, only one battery bank working, or inconsistent power. This could be due to a blown fuse within the switch itself, a faulty switch mechanism, or even corroded connections. Before replacing the switch, check the fuses first. Often, a simple fuse replacement resolves the problem.
If the fuse is intact, the switch itself might need replacing or professional repair. Inspect the wiring for loose connections or corrosion; cleaning these connections can sometimes restore functionality.
Dead Battery
A dead battery is a common occurrence, especially if you leave lights or appliances on accidentally. The first step is to check the battery’s voltage using a multimeter. A reading below 12.2 volts indicates a low charge. If the voltage is low, attempt charging the battery with a suitable charger. If the battery remains dead after charging, it may need replacing.
A constant parasitic drain can also cause a dead battery. This drain occurs when a small amount of current is drawn from the battery even when the trailer is turned off. Identifying and disconnecting the source of this drain is crucial.
Battery Drain Diagnosis
Persistent battery drain can be frustrating. Locating the source requires patience and a multimeter. First, disconnect the negative battery terminal. Then, using the multimeter set to measure current, connect the negative lead of the multimeter to the battery terminal and the positive lead to the negative cable. Any current reading indicates a parasitic drain.
Systematically disconnect circuits (fuses or breakers) one by one, noting the current reading after each disconnection. The circuit that causes the current reading to drop significantly is likely the source of the drain. This could be a faulty appliance, a malfunctioning light, or even a short circuit in the wiring.
Troubleshooting Flowchart
A systematic approach to troubleshooting is crucial. Follow these steps:
- Check the battery voltage using a multimeter. If low, charge the battery.
- Inspect the battery switch for any visible damage or corrosion. Clean connections if necessary.
- Check the fuses associated with the battery switch and replace any blown fuses.
- If the problem persists, test the battery switch for continuity using a multimeter.
- If the switch is faulty, replace it with a new one. Ensure correct wiring and connections.
- If the battery remains dead after charging, test the battery for capacity and consider replacement.
- If the battery keeps draining, use a multimeter to identify the source of the parasitic drain by systematically disconnecting circuits.
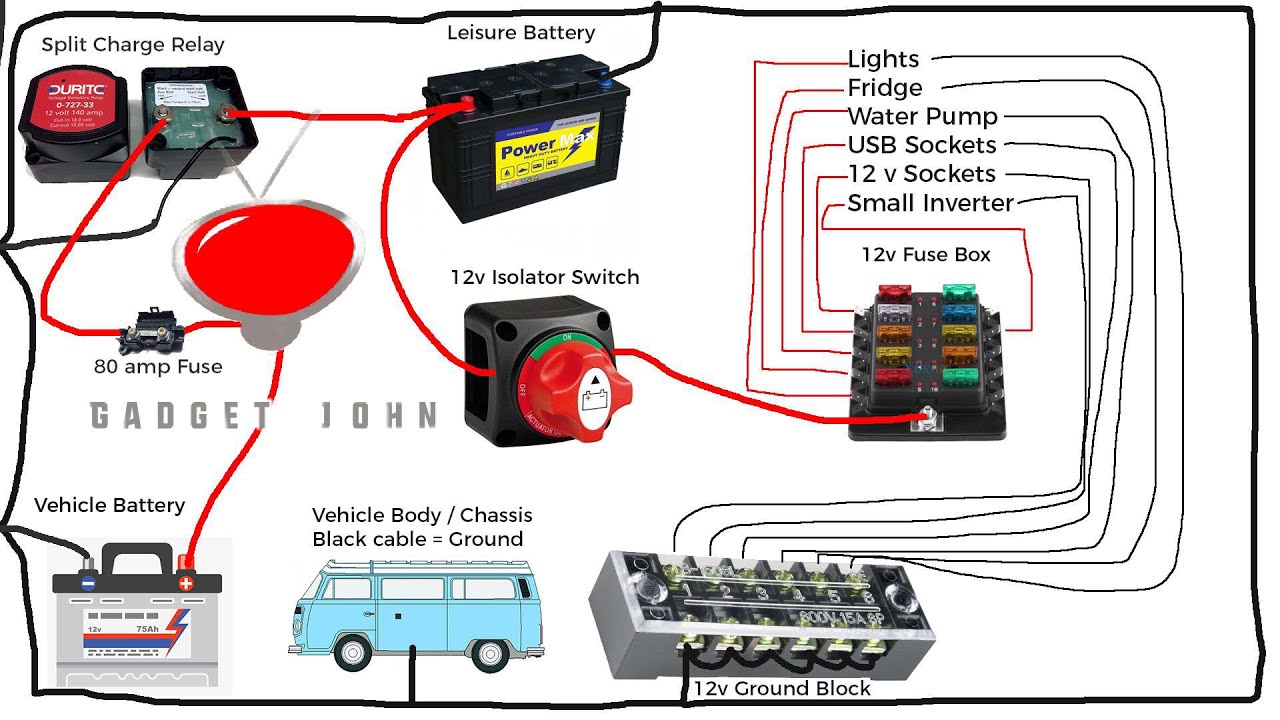
Battery Switch and Electrical System Integration
Your battery switch is the central nervous system of your travel trailer’s electrical power, controlling the flow of electricity between your batteries and the rest of your systems. Understanding its interaction with other components is key to efficient and safe power management.The battery switch acts as a gatekeeper, directing power from your trailer batteries to various appliances and systems.
It also manages the power flow from your tow vehicle’s charging system to those same batteries. This interplay is crucial for preventing power drain, ensuring proper charging, and preventing electrical damage.
Power Flow Management Between Battery Switch and Other Components
The battery switch interacts directly with several key components in your RV’s electrical system. Your converter, typically powered by shore power (120VAC), converts AC electricity to DC electricity to charge your batteries. The battery switch ensures that the converter charges only the selected battery bank. An inverter converts DC power from your batteries to AC power for running AC appliances.
Again, the battery switch dictates whether the inverter can draw power from the batteries. Solar panels generate DC power, which is then typically routed through a charge controller before reaching your batteries; the battery switch controls the power flow from those batteries.
Power Flow Management Between Tow Vehicle and Trailer, Battery switch on travel trailer function
When you’re traveling, your tow vehicle typically charges your trailer’s batteries through a 7-way or similar connector. The battery switch determines whether this charging current reaches your batteries. With the switch in the “off” or “both” position, this charging current will not reach the batteries. In the “battery” position, it will allow charging only from the tow vehicle.
Comparison of Battery Switch Systems
Several types of battery switches exist, each with different capabilities. A simple single-pole, double-throw (SPDT) switch allows switching between two battery banks or between batteries and the off position. More advanced systems, like those with multiple positions or electronic switches, offer more control and safety features. For example, a battery switch with an “all” position allows both banks to be used simultaneously.
Some switches incorporate monitoring features, providing real-time battery voltage readings. An electronic switch can automate charging and switching functions, providing more sophisticated power management.
Diagram of Electricity Flow
Imagine a simple diagram. At the top, we have a representation of your tow vehicle’s charging system, connected via a 7-way connector to a line leading to the battery switch. The battery switch is depicted as a central box with three outputs: one connected to a battery bank (Bank 1), another to a second battery bank (Bank 2), and a third to the rest of the trailer’s DC system (represented by a simple box).
Lines from this box branch out to the converter, the inverter, and the solar charge controller. Each connection shows the directional flow of electricity, highlighting how the battery switch controls this flow depending on its position (off, Bank 1, Bank 2, both). The solar panel system is depicted as a separate entity connecting to the charge controller, which then feeds into one of the battery banks.
The converter draws power from the shore power inlet and outputs to the battery bank, regulated by the battery switch. The inverter takes power from the selected battery bank and outputs AC power to the trailer’s AC system.
Mastering your travel trailer’s battery switch is a fundamental skill for any RVer. By understanding its function, proper operation, and common troubleshooting techniques, you’ll significantly enhance your camping experience. Remember safety first, always disconnect batteries before working on the system, and consult a professional if you encounter any issues you’re unsure about. Happy travels!
Frequently Asked Questions
What happens if I leave my battery switch in the “off” position for an extended period?
Leaving the switch off for a long time prevents any drain from accessories, protecting your battery. However, you won’t be able to use any 12V appliances.
Can I use a battery switch to connect a generator to my travel trailer?
No, the battery switch is for managing your house batteries. A generator connects directly to your trailer’s shore power inlet.
My battery switch is stuck. What should I do?
Try using a penetrating lubricant on the switch mechanism. If that doesn’t work, replacement may be necessary.
How often should I check my battery connections for corrosion?
Inspect your battery connections at least every three months, or more frequently if you’re in a humid climate.
